How to check Owls for injuries
For small and medium sized owls only
What if the owl is badly injured? Do I really need to check it over?
- First, do not assume that the owl is badly injured unless you have seen something obvious, such as protruding bone or bleeding, or it has a strong, unpleasant odour. In such cases there is little point in assessing its bodily condition and you should contact the nearest available bird-experienced vet without delay.
- If it is apparent that the owl is not badly injured but is surprisingly docile, barely conscious, obviously underweight, very young or active but ‘not quite right’, it needs assessment before any decision is made.
- In the case of a nestling owl that appears to be uninjured and is not too thin, it may be far better for you to deal with it and get it back into the nest before the following evening, rather than pass it to someone who may keep it for an unnecessarily long time.
- If you are not prepared to check the owl over by carefully following all the instructions below you must pass it to a vet or wildlife rehabilitator without delay.
Should I wear gloves?
It is advisable to wear thin leather gloves, but at some stage you will need to take them off in order to examine the owl properly. If you do not have an assistant to help remove your gloves it may be easier not to wear any. This should not be a problem, provided that you keep the owl’s feet under control and do not mind being pecked a bit!
Warning: if the owl stands more than 350mm tall and has black and orange eyes, do not attempt to assess it yourself as it may be an Eagle Owl which should only be handled by an experienced vet or rehabilitator.
Look before removing the owl from its container
When you start to uncover or open the container, look to see what position the owl is in. If it is standing facing you, check to see if one wing is held lower than the other – a wing held low suggests a possible injury to that wing. Notice if both eyes open to the same degree or if one is more open or closed than the other. Also look in the bottom of the box. If the owl has produced a dropping, notice what colour it is (white/black is good) and check to see if it has regurgitated a pellet (a sign that it has eaten recently). Also check to see if there is any sign of blood. All of the above are indications of the owl’s condition so make a mental note of any such observations, or, better still, write them down. Some casualties when stressed will ‘pretend’ to look fitter than they really are and it is only when quiet and undisturbed that their true state of fitness may be demonstrated. Now pick the owl up from behind. There is no rush. Take your time. What you are going to do next is change your grip so that you have one hand free to check the owl over.
Checking the owl over
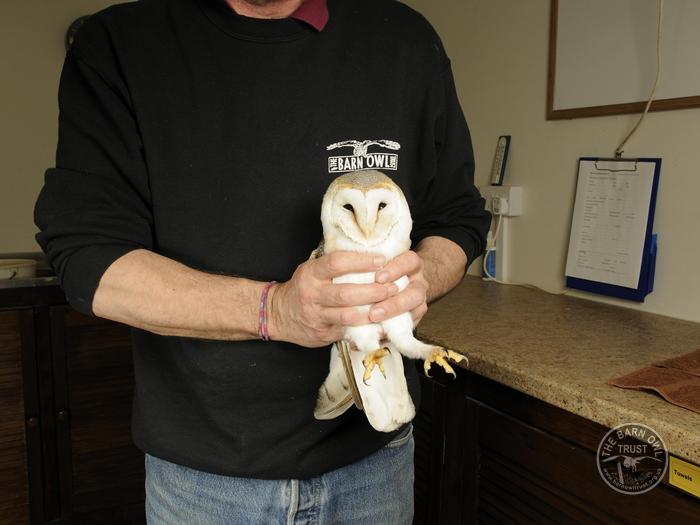
Starting with the owl in both hands, move it towards your lower chest, then slowly let go with one hand so that the owl is held in one hand against your chest, while keeping the upper part of its legs between your fingers so that the feet are pointing away to one side.
Keeping the owl gently pressed against you, slowly move the back of the owl onto the palm of your free hand, so that the back of its head is on your wrist or forearm.
Follow these instructions
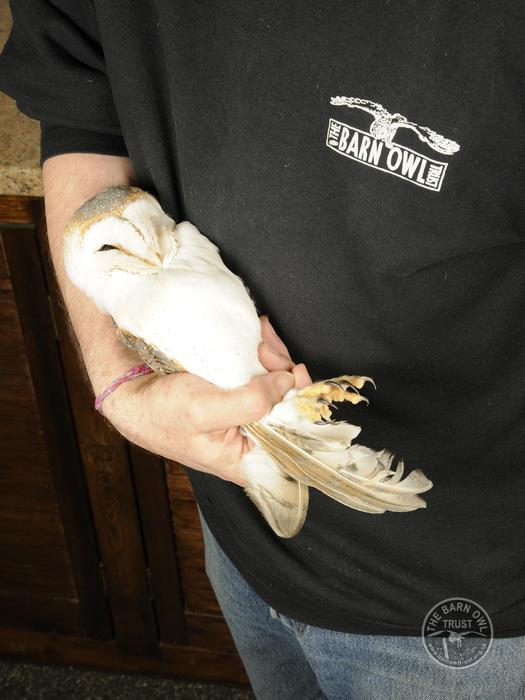
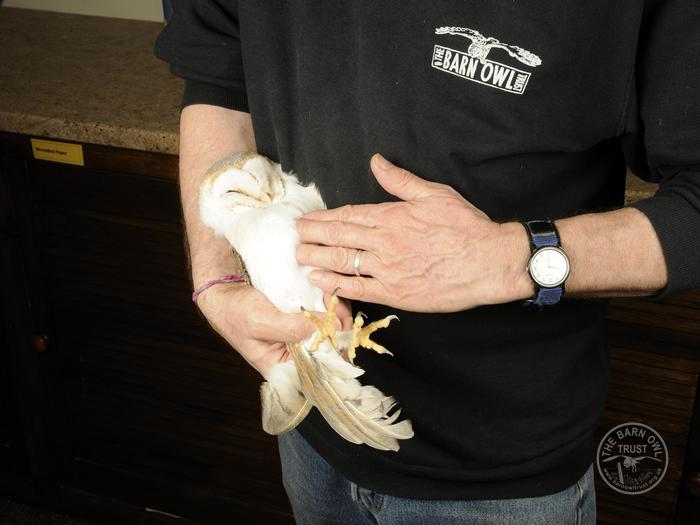
1. Lay the owl on its back, on the palm of one hand, with its feet pointing away, the back of its head resting on your wrist/forearm and with its legs and folded wings encircled by your thumb and index finger. Do this firmly but gently so that the owl cannot escape by wriggling nor injure the handler with its feet.
Tip: if the owl starts to struggle, pull the bottom of your jumper up and over its face, or lay a small towel or cloth over its face.
2. With your other hand, move your fingertips slowly and lightly onto its chest and feel its breastbone – the raised bony ridge running down the middle. Feel the breast (the wing muscles) either side of the breastbone. How far does the breastbone stick up above the muscles on either side? A few millimetres is normal; more than about 4mm suggests that the owl has been underfed for a significant period.
3. Now run the tips of your fingers right down the breastbone and lightly onto the stomach (the lower part of its front, between its legs). Does the stomach feel like an empty hollow of loose skin or can you feel a solid lump? Does the skin feel warm or cold?
4. Still with the owl on its back and using your free hand, hold the leading edge of one wing between your thumb and index finger and gently release that wing from the grip of your other hand so that it can be extended. Spread the wing slightly and with your thumb and index finger hold the leading edge of the wing and feel the bone inside it. Slowly feel your way along each bone (from the body right down to the base of the furthest wing feather), checking for a swelling, a wet patch, or movement partway along a bone. Dislocations are quite common so remember the amount of flexibility in each joint. Check the other wing in an identical manner and compare the feel, flexibility, appearance and movement of one wing to the other. When you are quite sure that the wings are identical, or that you have found a definite difference, return to the holding position (as in step 1 above).
5. Keeping control of the feet, hold one leg and gently release it from the grip of your other hand so that it can be extended. Feel along each leg bone, again checking for a swelling, a wet patch, or movement part-way along a bone. Check each leg in turn (be aware of the feet) and compare. Look out for unusual movement or perhaps a lack of movement. When you are quite sure that the legs are identical, or that you have found a definite difference, return to the holding position (as in step 1 above).
6. Now check the eyes – make sure both eyes look the same. If the eyes are closed you can gently open each eye in turn; place your index finger against the feathers below one eye, gently rest your thumb on the upper eyelid and gently move it up to open the eye. Initially, the eye may be covered by a nictitating membrane (known as the third eyelid). Simply wait a few moments for this to rise. Both eyes should look the same. If one eye definitely appears different from the other, then a visit to an experienced vet with an ophthalmoscope is needed. Blue eye colouration in some nestling owls is normal (although both eyes should still look the same).
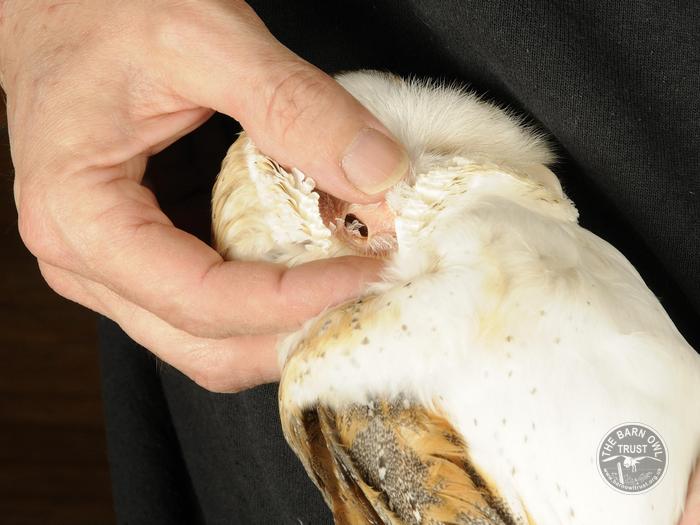
7. Now check the ears – an owl’s ear openings are situated on either side of the head between the eyes and the edge of the facial disk and can be found by separating the feathers. It is normal for the size, shape and position of the left and right ears to be slightly different from each other. All you are really checking for is signs of bleeding.
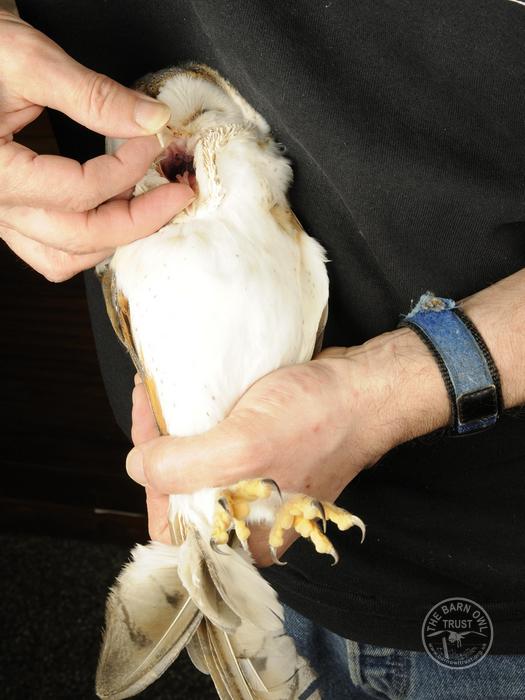
8. Now check the nostrils and the inside of the beak – the nostrils are small external holes in either side of the upper mandible (beak). Check for bleeding. Now you are going to look inside the beak. The easiest way to open the beak is to hold the upper mandible from above, between your thumb and index finger and gently push your thumbnail into the side of the beak between the upper and lower mandibles. A little force may be necessary at first, but never open the beak more than about 25mm (less for a Little Owl). When the beak opens, keep hold of the upper mandible and use your second finger to hold the lower mandible down or place a finger in the corner of its ‘mouth’ to keep the beak open. Look inside the open gape for signs of bleeding. In a serious collision, the upper mandible sometimes fractures from the skull causing movement between them, but this is very rare. If you see any sign of bleeding or anything else that is obviously not normal, then the bird needs to be passed to an experienced vet or rehabilitator.
The checking-over process above is the same irrespective of the species of owl you are dealing with or its age. However, before deciding what needs to happen next, you must find out what species of owl you are dealing with and whether it is an adult that has been self-sufficient in the wild or a young bird that has not. For the purpose of release planning this information is absolutely essential.
IMMEDIATE ACTION
What to do if the stomach is empty and the breastbone is protruding:
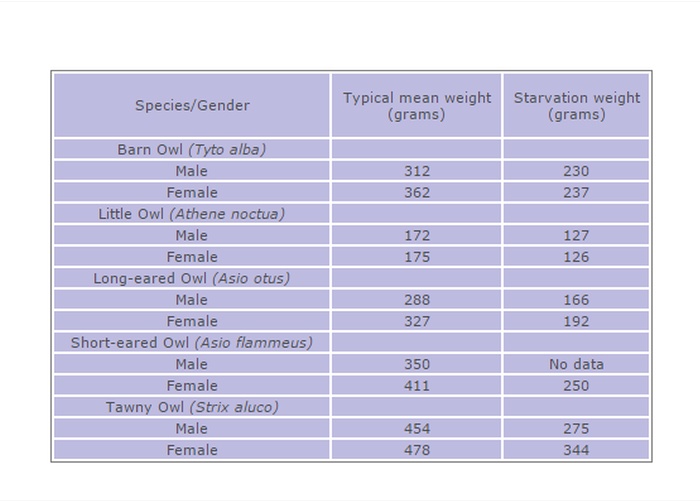
If the stomach is empty and the breastbone is very protruding (see checks 2 and 3 above) then the owl is underweight and probably emaciated. To confirm this you can weigh the owl by placing it (in its box) on kitchen scales and subtracting the empty box weight. Bird weights vary according to species (see below) as well as size, age, sex, time of year and stage of the nesting cycle. Immediately after rearing a brood, a small adult Barn Owl might be perfectly healthy at 260 g, whereas an unusually large individual may be dead at this weight. Assessments should always be based on the physical examination of the individual.
As a very rough guide the weights of Barn Owls over six weeks old are:
• Below 250 g = emaciated/dead
• 250-290 g = thin
• 290-310 g = okay
• Over 310 g = good
An emaciated owl needs to be tubed by an experienced person. Tubing means giving a specific amount of warm water and glucose via a syringe and a straight semi-rigid tube of specific length. Do not try this unless you have the right equipment and have been shown exactly how to do it. Take the bird to an experienced bird rehabilitator as soon as possible.
If the owl feels thin and its weight is less than about 260 g and it is impossible to get it to a vet or experienced rehabilitator, the priority is to get fluid into the owl followed by food. For at least the first few days the owl is most unlikely to eat or drink voluntarily; the carer must take full responsibility for its sustenance. For getting fluid in, the bare essentials are a suitable container for the owl, old towels and newspaper, warm water (ideally with glucose) and a dropper or very small (artist’s/child’s) paintbrush. The carer must be prepared to cut up dead mice or poultry chicks, although for the first three days raw chicken or beef can be used. If you have all these things and can spare half an hour roughly every eight hours you can keep and feed the owl for as long as it takes to put sufficient weight on – usually one or two weeks. If you have significant doubt about your ability or willingness to do this, you should pass the bird to an experienced bird rehabilitator as soon as possible. Instructions for giving fluid and food are provided in Short-term care of a wild owl.
What to do if the owl is cold and/or wet
If the stomach is empty and feels cold, place the bird in its container somewhere slightly warm and let it warm up for a few hours before attempting to feed it. If the owl is wet, place it somewhere warm and uncover the box a little so it can dry off. A saturated owl can take over 12 hours to dry and will benefit from a little extra ventilation, but not a cold draft. Warmth can be very good for birds that are cold, wet and in shock but be very careful never to dehydrate the owl. Further dehydrating a bird that is already emaciated can be fatal. Owls get the fluid they need from their food and rarely drink; even an owl that is dying of dehydration is most unlikely to drink. Aim to keep the owl in an air temperature of 15-25°C.
Other relevant pages
- Find out whether you should pass the owl on, and how you go about finding a good rehabilitator.
- If you’re sure the owl would not benefit from better treatment, better care facilities or better release facilities, find out about short-term owl care.
- There is more information on this topic in the Barn Owl Conservation Handbook.
